
Stucco Repair and Re-Skimming After a Deck Leak: A Homeowner’s Guide
See High End’s stucco repair and full-wall re-skimming project, with real photos and practical planning advice for Calgary homeowners after deck leaks.
A small repaired area can be the first thing you notice on an otherwise attractive wall. The colour may be close, yet a change in texture, a hard edge or a line across the elevation keeps drawing your eye back to the work. When stucco repairs follow a leaking deck, the challenge is therefore both practical and visual: understand the repair boundary, coordinate the work around the wall, and decide how the finished surface should read as a whole.
This High End Construction project illustrates that distinction. According to the client’s project notes, a patio deck had been leaking, damaging wall sheathing and contributing to water leakage into the basement. After the deck was replaced, High End restored the affected stucco and re-skimmed the entire wall section to avoid visible repair lines. The wider finish treatment was an intentional part of the scope, not simply a larger version of a small patch.
The photographs below document the supplied project. The planning sections that follow are general guidance for homeowners considering similar work, including Calgary-area owners comparing stucco repair options. They are not an installation specification or an account of unrecorded work at this property. You can also browse the concise stucco repair and re-skimming project page for the full photo set and confirmed scope.

What High End’s project notes actually confirm
The recorded sequence is straightforward. A leaking patio deck was replaced. High End then restored the stucco wall section and re-skimmed the whole section so the repair would not remain visually isolated. That gives the photographs useful context without asking them to prove everything about the building. The notes identify sheathing damage and basement leakage as the background to the project; they do not provide a complete investigation report.
It is equally important to keep the trade responsibilities accurate. The supplied information does not say that High End replaced the deck or the sheathing. Those activities should not be added to the company’s scope just because the wall was opened or because sheathing appears in a photograph. The documented High End work is stucco restoration and full-wall re-skimming following the deck replacement.
There is no published completion date, measured wall area, product schedule, laboratory report or water-test result in the supplied notes. None is needed to appreciate the visible repair and finishing work, but those omissions matter when comparing this example with a different house. A homeowner should not treat the article as proof of a particular coating system, a guaranteed leak-free outcome or a ready-made specification for another wall.
The useful lesson is narrower and more practical: the area requiring repair and the area requiring a coordinated finish are not always the same. Repair can focus on damaged locations, while the visual finish may need to extend to a more natural architectural boundary. That decision should be discussed before pricing and before the appearance of a small test patch becomes the standard for the whole project.
Reading the photographs without guessing the timeline
The first view establishes the setting: white stucco, black-framed openings, patio furniture, steps and a broad wall plane. It is useful because a repair is ultimately seen in that larger setting. A close-up may make a texture look excellent, but the wider elevation explains why a line or a change in finish could still be noticeable from the patio.

The oblique view around the black-trimmed window adds another perspective. Light reaches a textured wall differently when you stand beside it rather than directly in front. For an owner reviewing proposed work, those viewpoints are worth discussing. They help describe an appearance goal more clearly than asking for a repair to be “perfect” without identifying the viewing conditions or the wall area involved.

The opened horizontal strip shows layers and edges that are not visible in a distant finished-wall photograph. Wood sheathing, dark sheet material and exposed mesh can be seen in the supplied image. That is an observation about the photograph, not a diagnosis of every layer’s condition or an assertion about which contractor installed it. In another project, comparable photographs would be useful records for the people responsible for assessment and reinstatement.

The front-facing window-wall image shows how an exposed base strip relates to an otherwise continuous surface above. It helps explain the owner’s visual question: if a narrow strip is repaired, where should the new finish stop? The photograph does not answer the technical question by itself, but it makes the design decision understandable. A wall can require local repair while still benefiting from a broader finish discussion.
Repair, re-skimming and replacement are different scope decisions
For planning purposes, it helps to separate three conversations. The first is the repair: what damaged or unsuitable areas need attention? The second is the surface treatment: what work is needed so the wall has a coherent texture and appearance? The third is replacement: are larger portions of the assembly being removed and rebuilt? These questions overlap, but they should not be collapsed into one vague line called “fix stucco.”
In this project, the client specifically described stucco repairs followed by re-skimming of the entire wall section. That wording identifies a finish strategy beyond the individual repair locations. It does not establish that the entire wall assembly was replaced, and it does not mean every stucco wall with a damaged strip needs the same approach. A contractor still has to evaluate the existing surface and the proposed materials.
Homeowners can make estimates easier to compare by asking for a plain-language explanation of each part. Which areas are being opened? Which areas are being restored? Which surfaces are receiving a new finish treatment? Which adjacent surfaces will remain as they are? If two estimates use different boundaries, a difference in price may reflect different work rather than a disagreement about the value of the same work.
A larger finish area can also be an appearance decision rather than a claim that all existing material is defective. That distinction avoids unnecessary alarm. The owner may want one wall plane to read consistently because it is seen from a frequently used patio, even when the repair work itself is concentrated near the base. Describing that goal clearly makes room for an informed choice instead of a rushed assumption.
Ask how the proposed approach relates to the condition found on site, what alternatives were considered and what limitations remain. The answer should connect the recommended extent to the actual wall, not to a rule that every repair must be minimal or every elevation must be completely redone. The most useful explanation is one that a homeowner can repeat accurately after the contractor leaves.
Why a wall section can be a useful visual boundary
Buildings already have edges that help organize appearance: inside and outside corners, changes in plane, openings, material transitions and other architectural details. In general planning, these can be starting points for deciding where a finish treatment should begin and end. They are not automatic technical boundaries, but they give the owner and contractor a shared way to discuss what will be visible.
A homeowner can point to the wall between two corners and ask whether that is the intended finish area. That is more precise than saying “make it blend.” It also makes exclusions easier to understand. If a return wall, a door recess or the area above another opening is outside the estimate, the owner can decide whether the resulting transition is acceptable before work begins.
The American Cement Association’s overview of cement applications, including stucco explains that colour and texture depend on the materials and finish treatment. This is background for discussing appearance, not identification of the materials used in the photographed project. It supports asking about more than a colour name when planning a cement-plaster finish.
Think about the views that matter in daily use. A wall seen from a kitchen window, a patio chair and a side gate may be read in three different ways. An owner can identify those locations without inspecting dangerous areas or making a technical judgement. The contractor can then explain which appearance expectations are realistic and what a broader finishing area would change.
It can be helpful to mark a copy of a photograph with the proposed finish boundary. Keep the original image unmarked as a record, and use the marked copy only as a discussion aid. Once the boundary is agreed, it should appear consistently in the written estimate, any change approval and the final walkthrough. That prevents a useful design conversation from disappearing when the work becomes a contract.
Coordinate the leak-related work before closing the appearance discussion
A homeowner who has experienced leakage understandably wants the property to look complete again. That desire should not make the finish contractor responsible for promises outside the agreed scope. If a deck contractor, an investigator or another repair trade is involved, each person’s responsibility needs to be clear before the wall’s appearance becomes the only subject of discussion.
For a similar project, the owner might organize a short handoff note identifying what prompted the work, what has already been completed, which areas remain open and what the next contractor has been asked to do. That note is a coordination tool, not a substitute for technical assessment. Its purpose is to prevent assumptions such as “the next trade will deal with that” from being passed along without a named decision-maker.
Keep reports, approvals and photographs together rather than sending different fragments to each contractor. If someone has evaluated an area, ask whether the findings can be shared with the contractor preparing the finish scope. If an issue remains unresolved, make that visible. A missing answer is easier to manage when it is acknowledged than when everyone assumes somebody else has supplied it.
The project described here followed deck replacement, according to the client. That recorded sequence should not be turned into a universal instruction for all leaking decks or walls. Another property may need a different investigation, different trades or a different order of work. The transferable lesson is to agree the handoff and the decision points, rather than copy the sequence from a photograph.
Finishing decisions and water-management decisions also deserve separate records. A wall that looks uniform is an appearance outcome. Confirmation that a particular source of leakage has been addressed is a different question, with different evidence. Keeping both questions visible helps an owner appreciate the finish without treating a pleasing photograph as a performance test.
Doors, steps and the everyday working area deserve attention

The supplied door-and-steps photograph shows how closely exterior finishing work can sit beside everyday routes through a home. For a homeowner planning similar repairs, that is a reminder to discuss access early. Which door will be available? Where can people enter while work is underway? Are household members, visitors or deliveries likely to use the work area without knowing that access has changed?
Those are coordination questions for the contractor and owner, not directions for setting up a construction site. The appropriate work zone and protective arrangements depend on the location and the work. An owner’s contribution is to explain how the property is used, including pets, mobility needs, routine deliveries and any access that cannot simply be interrupted without notice.
Ask who will communicate changes to the household and when those changes will be confirmed. A clear daily contact can matter more than an impressive-looking schedule that no one updates. If an arrangement changes, the household needs to hear it from the agreed contact rather than infer it from tools or coverings near the door.

The lower-wall and patio-paving view also puts the work beside surfaces the owner may want protected and kept usable. Before work starts, identify items that can be moved by the household and items that require the contractor’s direction. Do not assume that a photograph of a protected surface establishes the protection method for another site. Use it to start a practical conversation about responsibilities.
A useful agreement explains how the work area is handed back at the end of a stage as well as at final completion. An owner should know which areas remain restricted, which items may be returned and which temporary arrangements must stay in place. This avoids the common problem of treating a tidier-looking area as a signal that everything is ready for normal use.
Make colour and texture expectations specific
“Match the existing wall” can mean several different things. It may refer to the overall colour, the scale of the texture, the shape of an edge, the way a corner is finished or the impression from the main viewing area. If the owner and contractor are thinking about different parts of that sentence, disappointment can arise even when both believe they have agreed on the goal.
Bring the discussion back to the elevation. Identify what is staying, what is changing and where the eye will compare the two. Ask how the contractor proposes to assess the finish before extending it over a larger area. A sample or review stage may be appropriate on some projects, but the size, location and purpose should be agreed with the contractor rather than prescribed by a general article.
The technical paper Common Sources of Distress in Stucco Facades, published by IIBEC, discusses repair compatibility and the difficulty of matching existing finish colour and texture. That is a reason to have an informed appearance discussion. It is not a specification for this house, and it does not establish that any particular product or repair method was used here.
Reviewing a finish through a phone screen alone can leave important questions unanswered. A photograph changes the scale of the texture and can alter the impression of colour. Where practical, make appearance decisions at the property with the people responsible for them. When remote review is necessary, be explicit about the limitations and about what still needs to be checked in person.
Use descriptive language instead of impossible promises. For example, an owner might say that they want the repaired wall section to read as one continuous surface from the patio, with no deliberately isolated patch boundary. That is a useful objective to discuss. It still leaves the contractor responsible for explaining the limitations of matching aged surfaces and for documenting the agreed approach.
Include adjacent details in the scope conversation
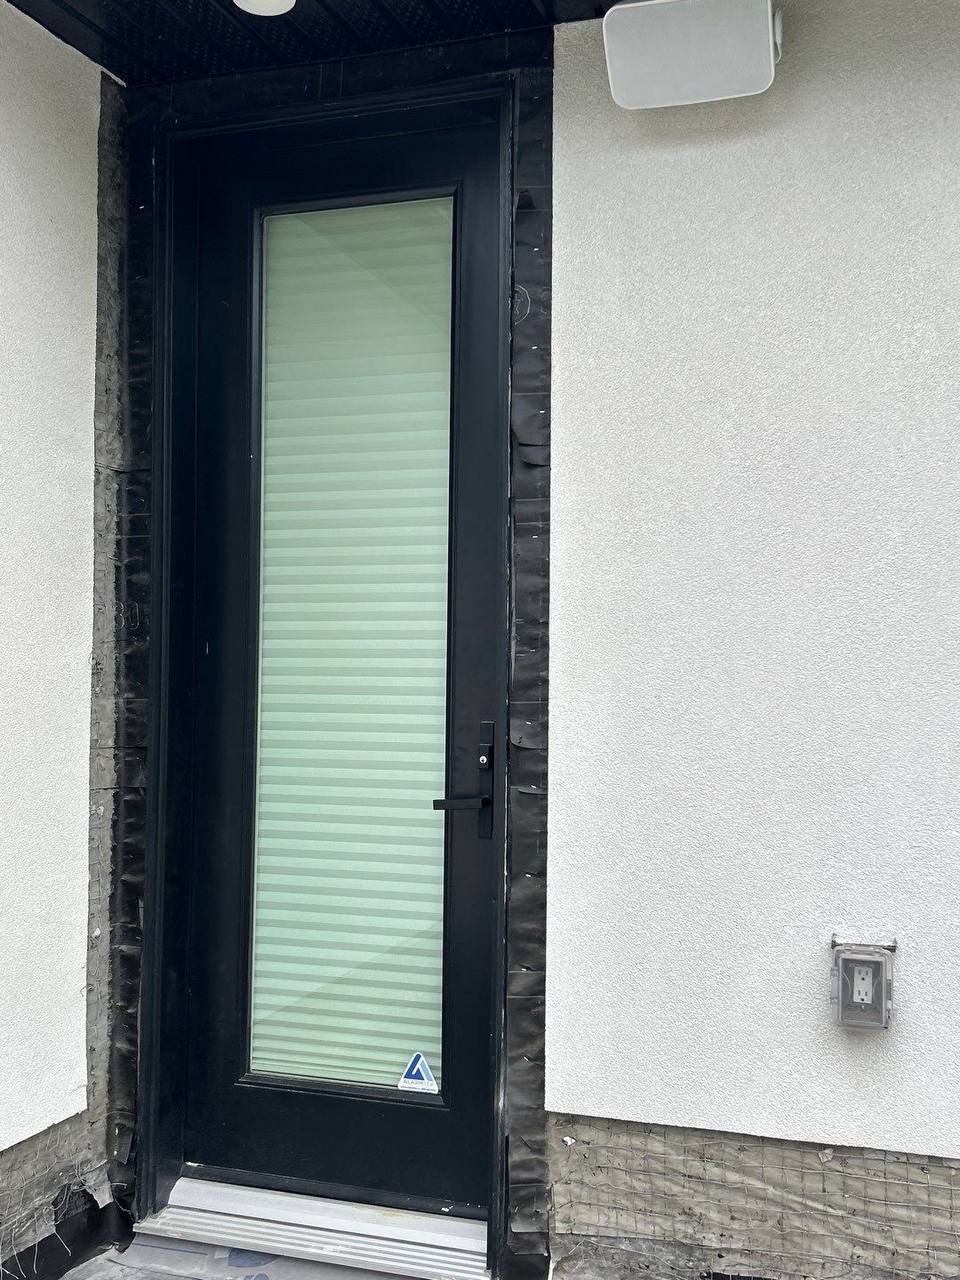
The glass-door and wall-corner image includes an exterior outlet beside the stucco. This does not indicate an electrical defect or electrical work by High End. It simply shows why a finish estimate should account for the details that already occupy the wall. An owner can point out fixtures and ask who is responsible for any necessary coordination around them.
A similar conversation may cover light fixtures, hose connections, vents, trim and other interfaces. The contractor should identify any work requiring a separate trade or a separate approval. A homeowner should not detach, alter or seal around those elements based on an article or a photograph. The useful planning task is to make sure they are recognized before the work area is prepared.
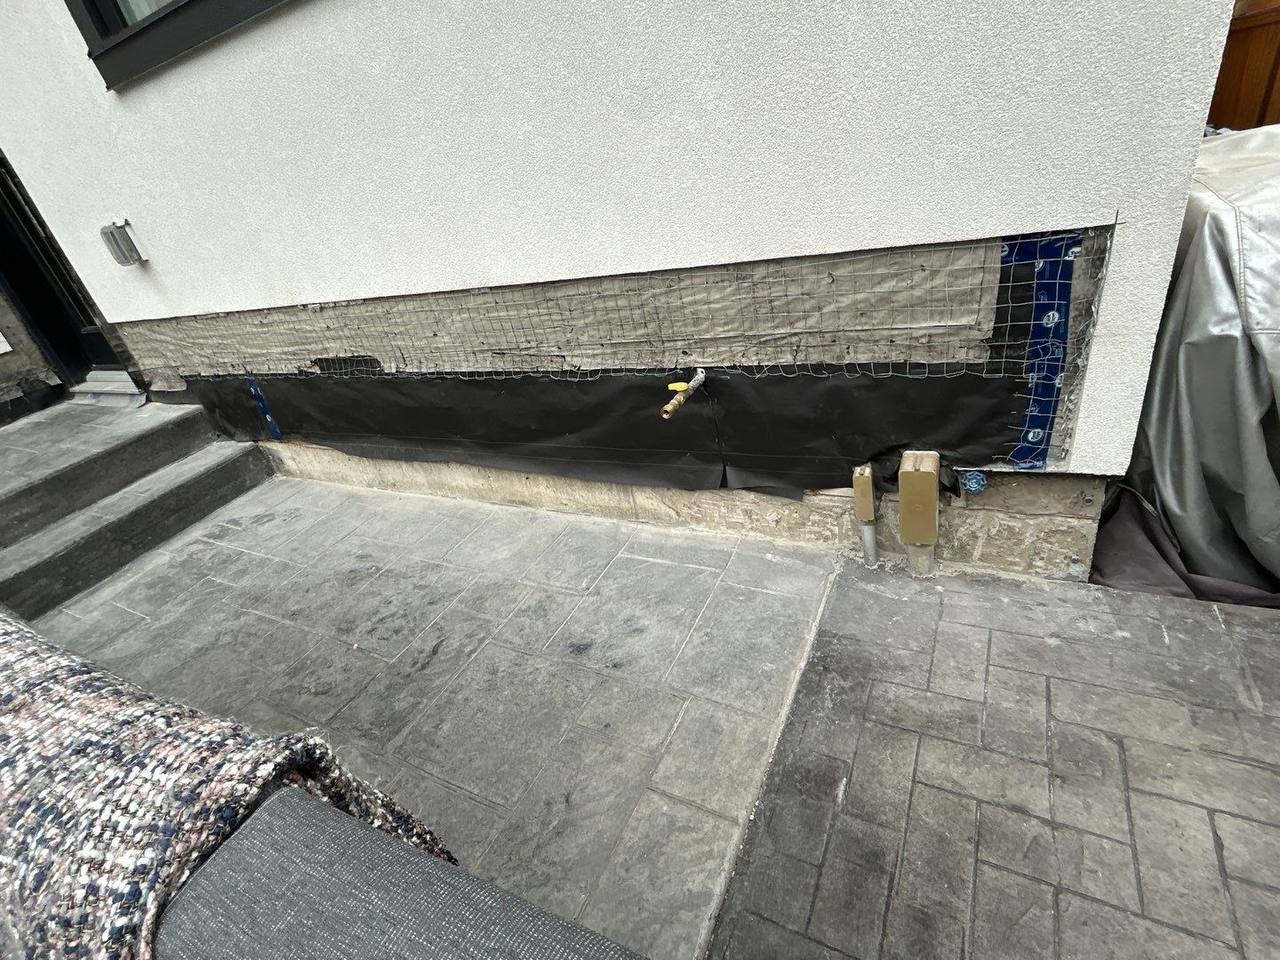
The water-tap photograph shows another ordinary detail within the repair setting. For the owner of a different property, it can prompt questions about access to services and protection of nearby finishes. It does not prove how the connection is detailed behind the wall or whether it contributed to the original problem. Visible context and hidden construction should remain separate subjects.
Write down any exclusions that affect the final appearance. If removal or reinstatement of a fixture is not included, who will arrange it and when? If a separate contractor is involved, who confirms that the finish trade can proceed? An estimate can be technically clear in its main repair area while still leaving these small but consequential handoffs unresolved.
Do the same for transitions at the ends of the repair. A photograph often concentrates attention on the centre of a damaged strip, while the final impression depends on its edges. Ask the contractor to explain the proposed termination and how the adjacent surfaces will be left. This is a request for a defined outcome, not a homeowner-issued technical detail.
Prepare an estimate request that reduces guesswork
A useful first enquiry does not need to sound like a construction specification. Start with what you know: where the problem is visible, what prompted the work, whether another contractor has already completed related work and what appearance you hope to achieve. Be clear when a statement is your observation rather than a finding supplied by a professional.
Include a wide photograph of the elevation, a closer view of the affected area and images showing the nearest openings or transitions. Take photographs only from locations you can access safely. A contractor can explain what additional views or site assessment are needed. Do not disturb the wall or climb to obtain an image that has been suggested in a generic checklist.
If related work has taken place, provide the available scope description and any relevant handoff information. For example, an owner might explain that deck replacement has been completed and that stucco restoration remains. That tells the finish contractor more than a message saying only “water damage.” It does not require the owner to diagnose the construction behind the surface.
State whether the priority is a local repair, a consistent appearance across a wall section or an assessment of both options. Being honest about that priority makes the discussion more efficient. It also allows the contractor to explain if the visible condition points to a different scope than the owner initially expected.
- Identify the wall and the main viewing locations.
- Describe the visible concern and the history you can document.
- List completed related work without assigning unconfirmed responsibilities.
- Explain access needs, occupied areas and items near the wall.
- Ask what site review is needed before a final scope can be provided.
High End’s estimate enquiry page is the appropriate place to begin that conversation. A photograph can help organize the discussion, but an enquiry is not itself a diagnosis, a confirmed price or an agreement that the same solution shown in this project will suit another property.
Compare estimates on the same boundary and outcome
The lowest total tells you little if the proposed work is different. One estimate may describe a narrow repair and another may include finishing across a larger wall section. Before comparing the numbers, compare the areas, the preparation included, the intended finish and the responsibilities for related work. This is how an owner can make the comparison fair without trying to choose the construction method alone.
Look for a description of what the contractor has based the estimate on. Is the scope based on photographs, a site visit or an opened area that has already been reviewed? Which conditions remain unknown? An estimate can acknowledge uncertainty professionally. In fact, an owner benefits when the limits of the initial information are visible rather than hidden inside a confident-looking total.
Ask how additional findings would be communicated. A useful change process identifies the issue, explains its effect on the work and provides a decision before unapproved additional work proceeds. The exact contractual arrangement belongs in the agreement between the parties. The owner’s planning objective is simply to know who can approve a change and how that approval will be recorded.
Check whether protection, access arrangements, removal of agreed debris and the final review are described. These items affect the experience of the project even when they are not the most visible part of a finish photograph. If an item is outside the scope, the owner can arrange it separately or ask for clarification instead of assuming that it has been included.
Finally, compare the appearance promise. A broad phrase such as “match existing” should be explained in relation to the wall and the proposed boundary. A contractor who describes the practical limitations gives an owner a clearer basis for approval than a vague guarantee of invisibility. The aim is a defined, achievable result, not a competition to make the most absolute claim.
Plan the budget without a misleading universal rate
This project’s price, measured area and labour record have not been supplied, so there is no factual project cost to publish. A universal square-foot figure would also hide many of the questions that matter to a homeowner. The extent of repair, the finish boundary, access, adjacent details and coordination with other work can all affect what is actually being priced.
For your own planning, separate essential repair questions from optional appearance choices. That does not mean the visual finish is unimportant. It means you can ask whether there are different acceptable scopes and understand what each would leave visible. If a broader finish treatment is recommended, ask the contractor to explain its purpose and its relationship to the repaired locations.
An owner can also decide which decisions need to be made before the estimate is finalized. Changing the finish boundary after work begins can be a different conversation from approving it at the outset. Ask about alternatives early, then record the selected option. This reduces the chance that a late preference will be confused with a defect in the originally agreed work.
Allow room in your planning process for unknown conditions without inventing a percentage or a contingency rule that may not fit the property. The important point is to agree how discoveries will be evaluated and approved. A written process is more useful than an arbitrary number that makes the budget look complete while leaving the decision-making unclear.
Decide how much visual change you actually want
A repair enquiry can contain two different preferences that need to be reconciled. An owner may want evidence of the damage to disappear while also wanting the unaffected exterior to remain exactly as it is. A broader finishing treatment can change how the wall reads, so it is worth discussing which preference takes priority and what the proposed scope can reasonably achieve.
Begin with the character you want to retain. Perhaps it is the relationship between the white wall and black openings, the existing texture or the way the patio elevation connects to a return wall. Pointing out those features gives the contractor a clearer design brief than simply requesting a newer-looking exterior. It also helps identify when a proposed change goes beyond the owner’s original intention.
Then discuss what you are prepared to change. A homeowner may accept a consistent treatment across one wall section but not want to extend the work around the entire house. Another may want wider options assessed separately. Neither preference establishes the technical suitability of a finish; both are useful information for the person explaining the available approaches.
Keep optional changes separate from the repair decision. A colour change, a different texture or work on another elevation should not quietly become part of a conversation that began with a damaged strip. Ask for any additional option to be described on its own terms so that accepting or declining it does not blur the scope already being considered.
In the supplied project, the stated appearance objective was to avoid visible repair lines through full-wall re-skimming. That gives this example a clear purpose. Your own brief should have the same clarity, even if the appearance you want to retain, the wall boundary or the options considered are different.
Keep related permit questions with the appropriate scope
Because this example followed patio-deck replacement, Calgary homeowners may also have questions about the approval requirements for their own deck work. The City’s current deck permit and application guidance provides project-specific information and routes for questions. Review the current official requirements with the appropriate contractor or City contact instead of assuming that one project photograph settles the requirements for another property.
The supplied notes do not describe the approvals, dimensions or construction of the deck at this property. This article therefore makes no permit-compliance claim about it. Nor does it decide whether a proposed stucco scope is purely a finish repair or part of broader work requiring additional review. Those decisions depend on the actual project and the current applicable requirements.
From an owner’s coordination perspective, ask who is handling each required approval and who is confirming the handoff between scopes. If different contractors have different responsibilities, put those responsibilities in writing. A clear record avoids the assumption that the presence of one contractor automatically covers every approval or every type of work associated with the wall.
Build a schedule around decisions, not just a promised finish day
Scheduling exterior work involves more than choosing an appealing date on a calendar. For planning purposes, ask the contractor what must be ready before work starts, when the owner needs to make appearance decisions and how changes in site conditions will be communicated. The contractor should determine the suitable working conditions and requirements for the actual materials and scope.
It is reasonable to ask whether a quoted period refers to time working at the property, the wider project window or a date that depends on another trade’s completion. These are different commitments. An owner who understands the distinction can plan access and household activities without treating every gap between visits as an unexplained delay.
Agree how updates will arrive and who will receive them. If two household members are approving decisions, identify the person authorized to give a final instruction. A short, consistent written update can prevent conflicting messages. This becomes especially useful when the contractor needs a decision about an area that was not visible when the original estimate was prepared.
Do not infer this project’s season, duration or completion date from the photo filenames. Those details have not been established. The photographs are useful records of visible conditions and work context; they are not a reliable scheduling template for a different wall or proof of how quickly another project can be completed.
Protection, records and handover belong in the finish plan
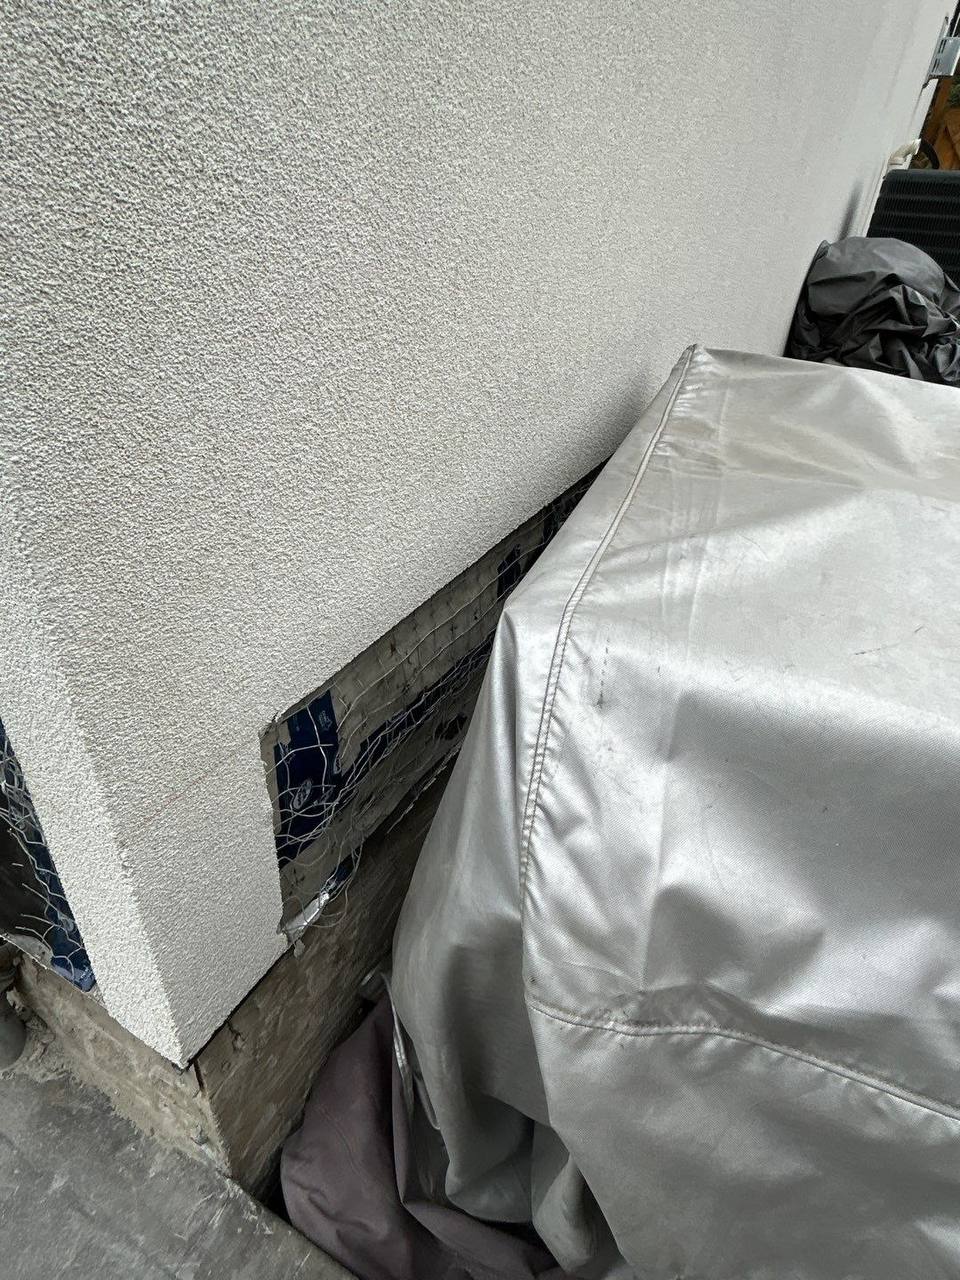
The image beside covered patio furniture is a reminder that a repair happens within someone’s everyday surroundings. The owner should identify belongings and surfaces that matter, while the contractor explains the protection and working arrangements appropriate to the site. Neither party should rely on a casual assumption that the other will move, cover or reinstate everything.
Keep a simple project folder with the agreed scope, approved changes, useful photographs and the final information supplied by the contractor. This need not become an elaborate report. The value is continuity: a future owner, another trade or the same homeowner a year later can understand what was agreed without rebuilding the story from scattered text messages.
At handover, review the agreed area rather than only the most attractive close-up. Use the main viewing locations discussed earlier, then look at accessible edges and interfaces with the contractor. Ask which observations are part of the agreed finish review and which questions need separate assessment. Do not create a risky inspection route merely to imitate the angle of a project photograph.

The textured-wall and lower-band image provides a detailed view within this supplied set. It can help a reader look more carefully at the surface rather than seeing “white wall” as a single feature. It does not establish a product, a coating thickness or a guarantee. For your own job, request the maintenance and product information that is actually relevant to the installed work.
Ask what the owner should do if a concern appears later, and how to describe it clearly. A location, a dated photograph and a concise account of what changed are useful. Avoid treating every mark as the same issue or assuming that a new concern must have the same cause as the original leak. The appropriate response depends on the observation and the scope of the completed work.
Maintain a useful record after the contractors leave
A record of the finished wall is most useful when it can be compared with later observations. Take ordinary photographs from safe, repeatable locations once the contractor has confirmed the appropriate time for the review. Include the wider wall and the relevant details, and keep the files with the project documents. The goal is not constant inspection; it is a dependable reference if a question arises.
Follow the care advice supplied for the actual finish rather than adopting a generic cleaning or coating method from the internet. Products and wall conditions differ. If you are considering attaching something to the wall, changing a fixture or commissioning another project beside the repaired area, tell the new contractor about the existing work and share the available information.
When another trade needs access near a repaired wall, discuss protection and responsibility before the next project begins. An attractive finish can sit beside future landscaping, deck maintenance, door work or service changes. Thinking about those interfaces is a practical way to preserve a clear project history and avoid arguments over which work occurred when.
If a new stain, separation or interior concern appears, document it and arrange the appropriate assessment. Do not cover it simply to make the wall look consistent again. That advice is about preserving useful evidence and getting a considered response; it is not a diagnosis of the cause, an emergency classification or a prediction about the photographed project’s future performance.
Homeowner questions about stucco repair and re-skimming
Does re-skimming mean the entire wall was replaced?
No. In this project the client described stucco repair followed by re-skimming of the entire wall section. That is not the same statement as full assembly replacement. When reading any estimate, ask which layers and areas are being repaired or replaced and which are receiving a finish treatment. Clear wording helps you compare the proposed work with your expectations without assuming that every term describes the same operation.
Why not finish only the narrow damaged strip?
A narrow finish boundary may remain visible within a larger wall plane. Here, the client specifically identified avoiding visible repair lines as the reason for re-skimming the full section. Another wall may present different choices. Ask the contractor to explain the appearance consequences of the available scopes and where each would stop. The useful decision is about the actual elevation, not a universal preference for the smallest or largest area.
Can the photographs tell me whether my wall needs the same work?
They can help you recognize questions to ask, but they cannot provide that decision. Similar-looking exterior finishes can conceal different assemblies and conditions. The photographs in this article belong to one documented job and show only selected views. Use them as an example of scope and appearance planning, then arrange the assessment needed for your own property rather than choosing a repair solely because a surface looks familiar.
Did High End replace the patio deck in this project?
The supplied notes do not make that claim. They say the patio deck was replaced before High End restored the stucco and re-skimmed the wall section. The article keeps that boundary intact. Accurate attribution matters when an owner is deciding which trade to contact or comparing responsibilities. High End’s confirmed contribution here is the stucco repair and finishing scope described by the client.
Does a uniform finish prove the leak has been resolved?
No. Appearance and water-performance confirmation are different questions. A photograph can show the visible result, while the appropriate evidence about leakage depends on the investigation, related work and any checks actually commissioned. No water-test result has been supplied for this article. For your own project, ask who is responsible for evaluating the source of a concern and what record will explain the work undertaken.
Should I choose paint, re-skimming or a larger repair myself?
Start by explaining the problem and the appearance you want, then ask a suitable contractor to assess the wall and explain the options. The right conversation includes the existing surface, the proposed finish boundary and the responsibilities for related work. This article does not provide a material specification or a product substitution rule. A homeowner can make an informed approval without taking responsibility for a technical design they have not been qualified to produce.
What if two contractors recommend different boundaries?
Ask each to describe the condition their recommendation addresses and the result their scope is intended to deliver. Put the proposed areas beside each other on copies of the same elevation photograph. Then compare inclusions, exclusions and unresolved questions, not only totals. If the technical recommendations conflict in a significant way, seek the appropriate professional clarification before choosing simply on the basis of a more reassuring sentence.
Can I obtain a reliable estimate from a close-up alone?
A close-up may be useful, but it can omit the wall’s scale, access and adjacent details. Include wider views and the history you can document, then let the contractor explain what additional review is needed. An initial discussion based on photos should not be confused with a completed site assessment or a fixed scope for hidden conditions. Good information at the beginning helps everyone identify what still needs to be established.
How should I describe an appearance concern at handover?
Identify the location, the agreed viewing area and the specific difference you are noticing. For example, explain whether the concern is a boundary, an edge, a colour comparison or a texture transition. Avoid changing the description into a different technical claim without evidence. A precise observation gives the contractor something useful to review and keeps the discussion connected to the scope and appearance expectations agreed before the work.
Is a re-skimming project automatically a full exterior renovation?
No. The confirmed work here concerns a stucco wall section after related deck replacement. That should not be expanded into a claim that every elevation, opening or exterior system was renewed. If you are considering wider work, ask for those areas to be assessed and described separately. High End’s exterior services overview can help you identify the relevant starting point for a broader enquiry.
Plan a repaired wall that reads as one surface
This project’s defining choice was the relationship between local stucco repair and a full-wall finishing area. The client wanted to avoid visible repair lines after the affected wall section was restored. The supplied photographs show why the wider elevation, the base strip, openings and everyday patio views all belong in that conversation.
For a similar concern, begin with the documented history, a few useful photographs and a clear description of the appearance you hope to achieve. Keep the cause of a leak, the responsibilities of related trades and the finish boundary separate enough to make good decisions. Then bring them together in a written scope that explains what will be done and what will remain outside the work.
Explore High End’s stucco repair service, compare other real jobs in the project portfolio, or request an estimate with your project photos. The next step is a conversation about your wall, not an assumption that another project’s materials or scope can be copied without assessment.
References and further reading
Tell us about your project.
Share a few photos and the work you have in mind. High End Construction can discuss the scope with you and provide a free written estimate.